
Clash for Windows 0.20.39 Install and Download for Windows and Mac
Welcome to our site! Clash for Windows Download and Install for Windows and Mac OS.
To get started, we additionally recommend Just My Socks. Their subscription-based proxy service is designed to help users bypass internet censorship, access geo-restricted content, and enhance online privacy.
Latest Blog Posts
Fndroid’s Clash for Windows is a software application compatible with the Windows operating system, designed to cater to advanced users seeking unrestricted access to geo-restricted content and enhanced online browsing security. This program offers a proxy utility that maintains anonymity by encrypting data connections, enabling seamless access to websites, videos, and games without limitations. The software is available for free to download and use. The latest version of the Clash for Windows is the version 0.20.39.
The software prides itself on a user-friendly interface that caters to individuals well-versed in advanced technology, promoting ease of use. It offers customization options for a range of parameters, such as server selection, HTTP and SOCKS5 protocols, and automatic startup connection. Importantly, its lightweight design guarantees minimal impact on computer performance and storage demands.
Why users like Clash for Windows?
The software’s ability to establish high-speed connections, ensuring uninterrupted streaming and eliminating buffering or lag-related issues, is highly valued by users. Furthermore, the program benefits from a dedicated community of developers who consistently enhance its features to keep up with the latest technological advancements and security threats.
Fndroid’s Clash for Windows proves to be an invaluable tool in situations involving government censorship or the need to stream content from foreign countries, providing users with the assurance that any desired website or online resource will be easily accessible.
Starting from version 0.20.5 and onwards, Clash for Windows offers compatibility with both Trojan and Shadowsocks protocols. It incorporates the TUN engine to efficiently capture packets, enabling optimal network functionality. Additionally, the software extends support for the Windows app store through the Universal Windows Platform (UWP), allowing seamless execution of games without the need for additional software.
What does Clash for Windows do?
Clash for Windows allows you to connect every Samsung device you have under the same WiFi network. Select each Samsung device separately and then start connecting them. First, install the app on your PC, and then log in with your Samsung account. The application runs in the background and can be accessed from the system tray.
First Steps
- Click here to download the app. Once downloaded, double-click it to install.
- Double-click to start the app. You will find the app in the tray at the bottom right corner of the screen. The app icon is a blue cat.
- Copy the API. Login to your dashboard, select “Clash for Windows” in the dropdown for Windows and click “Copy API”.
- Paste the API. Open Clash for Windows. Go to “Profile” (left-hand menu). Paste the API in the “Download from a URL” box and click “Download”. Make sure you select the newly downloaded server config file, and not the default.
Connect Clash for Windows software with a server
Follow these steps to select a server and mode:
- Go to “Proxies” (left-hand menu)
- Select Rule mode from the top (see box below)
- Select a server from the list under “WannaFlix”. This will be your main server. You can also select a different server for services like Netflix and Youtube.
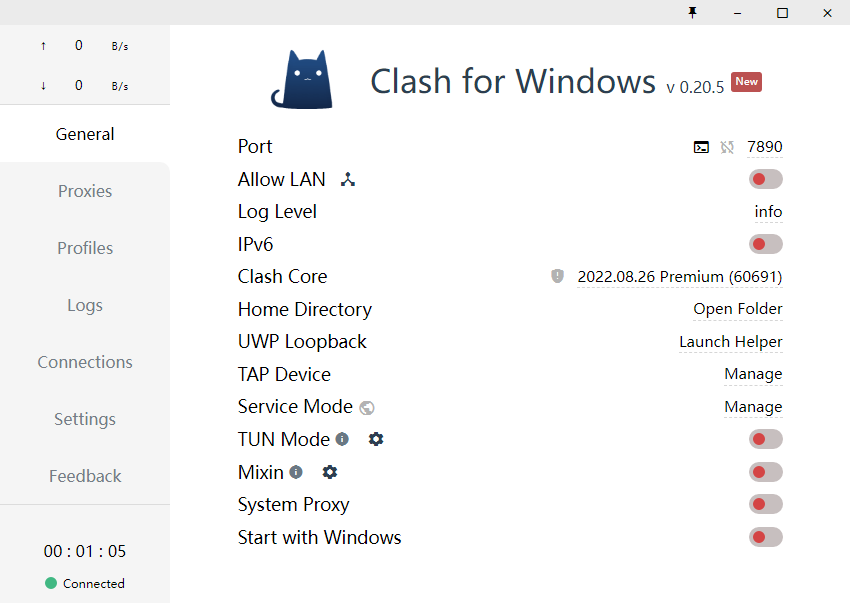
- Connect by going to the “General” tab and toggle the “System Proxy” switch to “ON”. You are now connected.
Clash for Windows software supported Windows OS
Windows 11 32-bit, Windows 11 64-bit, Windows 10 32-bit, Windows 10 64-bit
Add your servers
- Please click on “Manage your VPN Subscription” under “Your Subscription”.
- Under the box “Your Subscribe Links”, just click on the “Clash API Link” button to copy your link to the clipboard.
- Open the Clash for Windows app on your computer.
- Under Profiles > Download remote configuration file, paste your API link and click “Download”.
Choose a Server and Connect
- In the Clash for Windows app go to Proxies > Rule, and choose a server.
- Go to the General tab and tick “System Proxy”.
Hint: Make sure you select a server under Proxies > Rule and NOT under Proxies > General
More Resources
YouTube Videos